All Projects
.jpg)
.jpg)
.jpg)

Zipper Pouch
Date Posted:15 September 2023
A zipper pouch is a small bag that has a zipper closure and is fantastic to have for various uses! Store items like makeup, coins, cards, keys, accessories, toiletries, and so much more. This tutorial teaches you how to make a zipper pouch easily, guiding you step by step. You can make your zipper pouch with any choice of fabric, making it as trendy as you like. It's a great project for beginners and experts alike and makes a wonderful gift idea for your friends and family. Create one for yourself or for someone else, and enjoy the process and the result!
What you'll need:
- 8” zipper (not metal)
- CoreSpun Polyester Thread to match fabric
- Rotary Cutter
- Cutting Mat
- Marking Pencil/Frixion Pen
- Mini Iron
- Wool Pressing Mat
- Spray Starch
- Seam Gauge
- Sewing machine
- Zipper Foot (suitable for your machine)
- TNC 80/12 Universal Needle
- Quilting Ruler
- Washaway Quilters Tape
- Echidna Small Clips
- Purple Thang
- Thread Snips
Fabric requirements:
- 1 x Fat Quarter - Outer
- 1 x Fat Quarter - Inner
- Fabric Scrap 3” x 2” - Zipper Tabs
.jpg)
Shop online:


Step Overview
The steps below are just an overview of the project instructions and must be used in conjunction with the tutorial video. Print these steps out to have beside you when watching the video as a reminder.
- Firstly, iron your fabrics to ensure easy cutting.
- Cut the zipper tab fabric 3” x 2” or use a quilt binding remnant. You need two zipper tabs.
- Create the zipper tabs: If it is not already folded, fold fabric in half lengthways and press. Fold each side of the tab fabric with raw edges to centre of the strip and press. Fold in half again and press. Repeat for the 2nd tab.
- Cut the outer and inner fabric rectangles 9” x 7”.
- The zip should be 1” smaller than the pouch - we use an 8” zip.
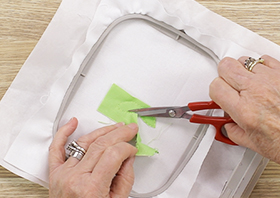
- Take the zip and trim the end so the stopper is at the edge of the zip.
- Cut four pieces of washaway tape and attach to the inside of each tab.
- Take the pre-prepared zipper tab and remove the protective paper from the washaway tape on each side of the tab. Press the zipper with the stopper nesting into the folded edge of the tab. Finger press in place on both sides. Repeat the same process for the other end of the zipper tab.
- Cut two pieces of washaway tape, and tape to the topside of the zip on each side of the zipper teeth.
- Attach the zipper foot and sew along each end of the zipper tabs, ensuring top and bottom of the zipper tab are aligned.
- Trim the zipper tabs back to the edge of the zip.
- Take one outer rectangle and mark the centre onto the wrong side of the fabric.
- With the zipper tabs now attached at each end of the zipper, measure and mark the centre of the zipper.
- Remove the protective sheet from the tape, and matching the centre point from the fabric, press the outer fabric right side down onto the top of the zip. Finger press the fabric onto the zip.
- Cut another piece of washaway tape, and press onto the underside of the zip. One piece of washaway tape on each side of the zipper teeth.
- Remove the protective sheet from the tape, and aligning the inner fabric with the previous outer square, finger press in place. The zip should look sandwiched between two pieces of fabric.
- With the zipper foot aligned with the edge of the fabric, begin stitching from the edge of the zipper tab to the other end of the zipper tab (Note: this will leave approx ½” unsewn at each end of the zipper pouch). Press the inner and outer fabric away from the zipper teeth.
- Repeat steps 12 to 17 for the other side of the zip.
- Press each side of fabric away from the zipper teeth with your iron. Top stitch around the zipper using the zipper foot.
- Use the stitching on the zipper tabs at each end as a guide to turn and sew over the zip to topstitch along the other side.
- Unzip the zip half way.
- Take the two outer pieces and fold up with right sides together. Clip together with small Echidna clips. Do the same with the inner fabric pieces.
- Where the tabs and two inner and outer seams meet, squeeze together so the tab flattens a little. Clip all four seams together. Repeat for the other side.
- Beginning two inches in from the corner of the bottom edge of the inner fabric, sew around the outside of the zipper pouch with the zipper foot. Try not to remove the clips holding all four seams together, until it is essential. Sew slowly ensuring the zipper foot captures all four seams together on each side.
- Trim the corners of the inner and outer fabric and turn the zipper pouch the right way out through the inner fabric and the zip. Poke the corners with a tool that gives a sharp look, and press with your iron.
- Machine sew the turning gap closed and press again.
- Congratulations! You are finished!
Don’t forget to show us your finished projects on Instagram or Facebook #echidnasewing #madebyme

Free Embroidery Designs
We're excited to offer our free Echidna designs available for download. These free designs are perfect for those at a beginner or an advanced level. Add these designs to your stash and create incredible embroidery!
View all free designs >
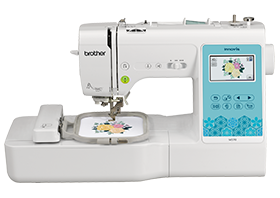
Sewing, Quilting and Embroidery Machines
Interested in learning how to sew, quilt or embroider? Take a look at the innovative Brother machines available for purchase at Echidna Sewing. Wherever possible we will beat any deal and you will always receive ongoing service and support!
Find out more >
Learn to Sew or Embroider with Echidna Sewing
Come along to our fun-filled classes to learn more about sewing, embroidery and crafting. Classes cater for all skill levels, whether you're just starting out or already have advanced knowledge.
Find out more >
Echidna project material/ fabric requirements are an indication only and can seem to be generous. This has been intentional. Should you make a cutting or embroidery mistake you will have sufficient fabric to rectify your error.