All Projects


Fly Away Birds
Put on your sewing cap and try our Fly Away Bird project! These sweet, decorative birds are fantastic as a hanging ornament or even to gift to someone special. They're easy to create with just a few tools needed, and you can make them to your own style using your choice of fabric and buttons.
We'd like to especially thank The Mary Potter Foundation for providing the sewing pattern for these Fly Away Birds and allowing us to share this wonderful project with you.
Download Fly Away Bird Pattern & Instructions
What You Need:
- Various scraps of cotton fabric (contrasting or matching is acceptable)
- Fibrefill
- 60cm ribbon (width approx. 6mm wide)
- Seed beads x 2
- Button (optional)
- Thread
- Pins
- Scissors
- Sewing machine
Instructions:
- Using a lightbox & blue washaway pen, trace the bird shape onto the wrong side of 1 x piece of bird body fabric.
- Place the two fabric body pieces right sides together and cut the bird shape on the drawn line.
- Pin the bird together inserting ribbon in place (as shown on the pattern).
- Attach the ¼” foot and begin stitching the body with the edge of the foot aligned with the edge of the fabric. If your machine has a “pivot” function, set it on to assist with easing around the curves.
- Use the sewing tip below to complete the machine stitching of the bird.
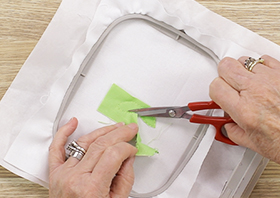
- Trim back the seam
- Use the same method to stitch bird wings together.
- Fill body and wings with fiber ill
- Hand stitch openings together
- Attach wings as indicated (or you could use a button to stitch the wing as shown in our sample)
- Stitch seed bead in place for eyes
Download Fly Away Bird Pattern & Instructions
TIP – To achieve a smooth curve


- Once you have straight-stitched your bird pieces together, use a small zig-zag stitch (width 2, length 1.4).
- Stitch as close to the outside of straight stitch.
- Use your mini hoop scissors to trim back as close as possible to the zig-zag.
This method provides extra support for the fabric when trimming close to the stitching, resulting in a smooth curve with no clipping required on the outside or inside curve.

Sending Your Donations
Please send any donations made directly to the charity:
The Mary Potter Foundation
Connery House
Calvary North Adelaide Hospital
89 Strangways Tce
North Adelaide, 5006
Be sure to include your name, postal address and contact details with your donation.
Free Embroidery Designs
We're excited to offer our free Echidna designs available for download. These free designs are perfect for those at a beginner or an advanced level. Add these designs to your stash and create incredible embroidery!
View all free designs >
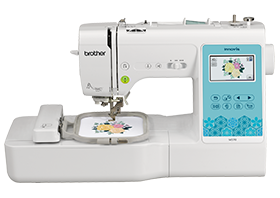
Sewing, Quilting and Embroidery Machines
Interested in learning how to sew, quilt or embroider? Take a look at the innovative Brother machines available for purchase at Echidna Sewing. Wherever possible we will beat any deal and you will always receive ongoing service and support!
Find out more >
Learn to Sew or Embroider with Echidna Sewing
Come along to our fun-filled classes to learn more about sewing, embroidery and crafting. Classes cater for all skill levels, whether you're just starting out or already have advanced knowledge.
Find out more >
Echidna project material/ fabric requirements are an indication only and can seem to be generous. This has been intentional. Should you make a cutting or embroidery mistake you will have sufficient fabric to rectify your error.